Wednesday, July 13, 2011

Baklava

Baklava has been one of my favorite deserts for some time. Everyone remembers the first time they ever tried Baklava and I certainly do too. I use to salsa dance (yikes!) and whenever I would take a break I would go to the restaurant that was located in the front of the dance hall. It was a little vegetarian place that served baklava and Irish soda (yum and yum). I remember the crunchy, organic, sweetness of it all. And I dared to bake it!

The Main Attraction:
Baklava

I grabbed the recipe from here, and went to work! I used walnuts and pistachios (and had a moment of temporary insanity when I was going to use cashews, odd) to fill the layers. These two nuts work really well together.


The little bits of green are so pretty mixed in with the light brown! I had about 3-4 cups finely chopped. You can by the walnuts already chopped but they are a bit pricey. 


Layering the phyllo dough is not as scary as it seems when you take it out of the package and realize it's bible pages thin! I promise!. And if it rips, that's okay too! Melted butter is the glue of the food world and can repair the phyllo dough easily. 

Be sure to butter the bottom of the pan (I used a disposable one since I was taking it elsewhere). 


Also, butter between each layer. Yes, EVERY layer. This is what created that flay yum yum of joy.


After going the correct amount of layers (so don't zone out, even though it's hard not too) Sprinkle about a cup of nuts, then continue on your butter/layer journey, until finished.

While making the syrup, many recipes call for lemon zest. I simply halved a lemon (gave the other half to the Wifey, how she eats them straight, the world may never know) and threw it in the mixture. Just be sure to sift it through a strainer for any seeds if you do.


Afterwards I simply removed the lemon. The mixture should stand until it is cooled. But it won't get much thicker.

Then when the pastry and sauce combine: OM NOM NOM NOM!


I'll have just one. =]

4th of July

Sorry to all of you out there in blogger-sphere who may follow my blog, my mind has been in other places.

I remember lying with my family watching the fireworks and thinking about how beautiful they are, but also about how fast they end. Fireworks live for one moment, to be shot into the sky, full speed ahead, with all eyes on them, and produce the most beautiful creation they can, then they fade.'


That is pretty much how life is, or should be. Sometimes it's hard to remember how fleeting life really is. I sat there underneath the starry night sky, and it dawned on me that I really need to start making a change, as well as improving everything that I want to in life. I'm 20 years young, very young to most people over (cough 35) but in 5 years I will have reached what will probably (and hopefully) be 1/4 of my life. To sit and think, wow, 1/4 of my life is almost over can really serve a person a HUGE slice of humble pie.


I just hope that all of you out there are really doing what you love, because there is no day, but today. Tomorrow is not promised and your future truly is what you make it.

The Main Attraction:
Life

Go forth and be like those fireworks! Powerful, risky, exhilarating, beautiful, and honest; and do all of these things full speed ahead.

Saturday, July 2, 2011

Chocolate, Vanilla Swirl, like me!


Okay so the title was a bit of humor, seeing as I am multiracial or "mixed" Mixed breed as my best friend and I use to call ourselves!

So anyhoo, today was the Wifes, fathers, birthday. (I suppose I could have just said father in law =) And she wanted to make him something special! Wifey loves to eat, and watch me cook/bake, but not so much do it herself. But this time she got into the kitchen and I was SO proud, the cake came out so well!

The Main Attraction:
Chocolate Swirl (Marble) Cake

***Note, this is another recipe where it's kinda all about the technique. Baking is already down to a science, you just need your thoughts to help you create! Practically anything can be swirled into a vanilla cake!

1 Box of vanilla cake mix (Yes, she cheated :), made according to directions
Cocoa powder (to taste, about a tbsp or so)


1. After you make the vanilla cake use a measuring cup and set aside about 1/2- 1 cup of batter in a separate bowl.

2. Pour the remaining vanilla cake mix into whatever baking dish you wish to use. (I used to 8 inch-ers, round).


3. Stir the cocoa powder into the vanilla batter that was set aside, until incorporated.

4. Drizzle the batter over the white cake...


...and mix gently with a fork until swirled to your liking.


5. Bake according to package directions, or your recipe.

6. Frost if you wish, and eat until your hips say, "No More!"

Live Swirl Action! Ha!

Friday, July 1, 2011

Salad of Yuminess

I was so proud of the wife when she made this salad!

Looks like I could learn a thing or two from her as far as presentation is concerned.


She was that way about her though! Something that I am constantly jealous of! She can do ANYTHING without trying and be so great at it!


The Main Attraction:
Wifey's Lazy Day Salad

1 Handful of spinach
2 slices of turkey breast (mesquite)
1 Small handful of finely shredded mozzarella cheese
And many many mandarin oranges (she goes crazy for them, I however do not).


Enjoy the yuminess!!


Honey Garlic Pork Chops

I was surfing through Rock Recipes again and I found the yummiest pork chop recipe ever.


I don't know about you, but my childhood included pork chops, many of nights. My mom simply dredged them in flour, salt, and pepper then pan fried them. Her favorite was to serve them with macaroni (that dreaded blue box) and sweet peas mixed together. 


Oh memory lane!


But this recipe is one that I know she would love.


(It would also be really good with boneless, skinless chicken breast).
The Main Attraction:
Honey Garlic Pork Chops


**Note I halved the flour mixture because I usually only cook for two, but the sauce recipe I doubled! I love sauce! The recipe included is the one that I used.


Dredge:
1\2 Cup Flour
1 tsp salt
1 tsp  black pepper
1/2 tbsp ground ginger. 
1/2 tbsp paprika 
A couple of pinches of italian seasoning
A pinch of cayenne (red) pepper


Egg wash:
1 egg, whisked
1 tbsp cold tap water


Combine all of ingredients for the dredge and prepare the egg wash in two separate bowls. Dredge the pork chops in the flour mixture, dip them in the egg wash (both sides), and dredge them in the flour mixture again. Be sure to press the flour mixture on the pork chop to adhere. 


Heat oil over medium heat (I used vegetable, but peanut works great too) until a sprinkle of water sizzles and disappears.  Lay the pork chops in the oil and cook for about 4-5 minutes on each side. This may be pushing it but I'm terrified of under cooked meat (unless it's steak for some odd reason) and the Wife gets wide eyed at any sign of pinkness. Drain on a cooling rack or paper towels.

Meanwhile!

While the chops are getting yummy you can prepare the sauce.

Sauce:
2 tbsp of olive oil
4 cloves of minced garlic
1 1/2 cup of honey
2/3 cup soy sauce (i use a low sodium version)
A couple pinches of black pepper


In a sauce pan add the olive oil and the garlic and saute over medium low heat until fragrant. (But don't brown). Then add the honey, soy sauce, and pepper and mix for about five minutes. Remove from heat and let sit for 5 more minutes (or until thickened some)
I just pored the sauce over the pork  chop, but feel free to serve the sauce on the side for dunking!


I served it over white rice with brioche, yes I have an unhealthy love of carbs! 


Reminds me of how my plate looked as a kid! Mom would be proud.


Brioche yum yum!

I have always loved Brioche. It's one of those simple things that just taste SO GOOD! There's nothing like this french treat to sop up some yummy sauce. Although Challah is by far better french toast (sorry!), brioche can withstand the weight of just about anything you need to dip it in.


I did one braided loaf of brioche and a batch of the more traditional buns. Both were tender and delicious. I scooped the recipe from Rock Recipes, where I also got a great pork chop recipe. I didn't change anything from the recipe, except that I hand kneaded it. Of course hand kneading takes quite a bit more work, but it's just that much more rewarding.


The Main Attraction: 
Brioche


4 cups flour
1 envelope of instant yeast
1/2 cup sugar
1 tsp sea salt
1 cup real butter, slightly softened and near room temperature (NO SUBSTITUTES) Cut butter in about a dozen small pieces
1/2 cup whole milk (or for even richer brioche substitute undiluted evaporated milk)
4 eggs at room temperature
1 tbsp vanilla extract

I didn't use a stand mixer, so I added the flour,


 salt,


 yeast,


 and sugar (I used raw sugar)


 to a large bowl. 


And combined the ingredients.


Next I added the eggs,


 milk,


 and vanilla extract


then mixed it together until all of the dry ingredients were fully incorporated.  The dough may be looking rough at this point but that is normal.  At this point you want to turn the dough out on a clean surface.  And make sure that the butter is cubed. As you start to kneed the dough add a couple cubes a butter at a time.  Continue doing this until all of the butter is used and the dough become smooth looking, and elastic to the tug. 


This took me about 8 minutes. It's important not to work the dough more than you have to.  After this last step, cover and let the dough double in size (about 2 hours, less if your kitchen is warm).  When the dough is done rising,  hand knead it for about 5 minutes and form into whatever style you want the Brioche to bake in. Let rise for about 2 more hours. Hey, I never said that bread making is a short process! Usually the two hour intervals go pretty fast, especially if you have a billion other things to do. Um, Xbox anyone? Ha!


Brush with the tops with egg wash:
1 Egg
1 tbsp of water


...and bake at 350 until golden brown on top and a tooth pick comes out clean. For me, that was about 25 minutes. 


Then, viola! 


Nope I couldn't even wait until the Wife took the picture!
Enjoy this yum yum!

Tuesday, June 28, 2011

Blackened Salmon and Cheesy Broccoli Yum Yum!

So I love spicy food, no really, spicy food and I have a love affair of sorts. As I have gotten older it becomes apart of my daily intake. I think it may be a sort of 'You want what you can't/shouldn't have' considering I have acid reflux. 


BOO!


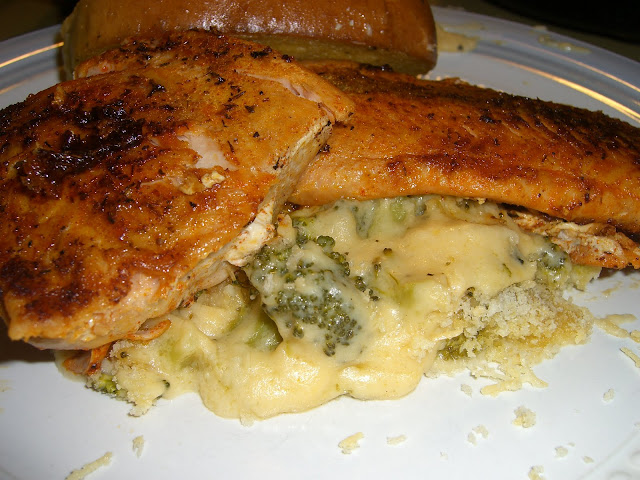
Anyhoo, tonight I thought I'd go easy on my esophagus by pairing the spiciness of the blackened salmon with a creamy, cheesy, broccoli gratin yum yum of goodness. Hey, one can't ever have too many adjectives! 


Again I was browsing foodgawker (aka crack for the foodies eyes) and I came upon what would go so great with the blackened salmon, Cheesy Broccoli Gratin straight from Cheri over at Kitchen Comments! There's really no need for my to post that wonderful recipe here since I didn't change a thing (except cheat and add tons more panko bread crumbs, yum-tastic!)


Also I used fresh broccoli instead of the frozen stuff. Not because the frozen stuff isn't good, but more so because that is just what I happened to have lying around in my crisper. 


So I just cut that up and followed the recipe as written. Turned out delish!


I also used whole wheat white flour.


The Main Attraction:
Blackened Salmon


For me there really isn't much to the recipe, but kind of more to the technique. If you have a full stock of herbs and spices in your reach than by all means make your own blackened seasoning! There is a great recipe here. Or you can cheat and just buy it premade. 


Especially for those of you out there in blogland that are still getting herbs and spices bit by bit. (Like myself)


Step 1. Defrost your salmon if it's frozen. (preferably ahead of time but if you use the microwave i'll never tell!). Also, set your pan on the eye of the stove and turn it on medium heat (4/5)


Step 2. Melt some butter (hell I don't know, two table spoons? More if you're using a cast iron skillet like myself). Then brush the butter on ONE side of the salmon. Technique people! =)


Step 3. On that same buttered side sprinkle the blackened seasoning to your spice tolerance. I personally coat that sh** on there but I think I was creole in a past life. 


Step 4. Your pan is hot enough when drops of water dance around the pan and disappear. Now, if you're using a cast iron skillet, pour a little of that melted butter into the pan. (or use Pam if you're fealin' figure friendly). If you're using a non stick pan, a little flicker of butter will do. 


Step 5. Set the salmon in the pan. DO NOT MOVE IT! All of those seasonings are forming the most delicious crust. F'in with it will only mess it up! While the salmon is in the pan brush and coat the side facing up.


Step 6. Depending on the thickness of your salmon you should be cooking it up to 6 or 7 minutes on each side. And really, to me, that's pushin' it. If you have an extremely beautiful thick piece of salmon just slap a lid on your pan, and the steam will cook the middle right up. Once one side is cooked, flip it, and DON'T FIDDLE WITH IT! Curiosity killed the cat. 


***And just while we're on the subject. Never pick up your fish with these:

If you do your fish will crumble, and if it doesn't crumble that means it's tough as sh**. 


Always, always, always, always use a spatula, even when plating. 


Step 7. Plate it up and enjoy! 


Happy yum yum!